


Product Description
Premium Performance for Serious Golfers
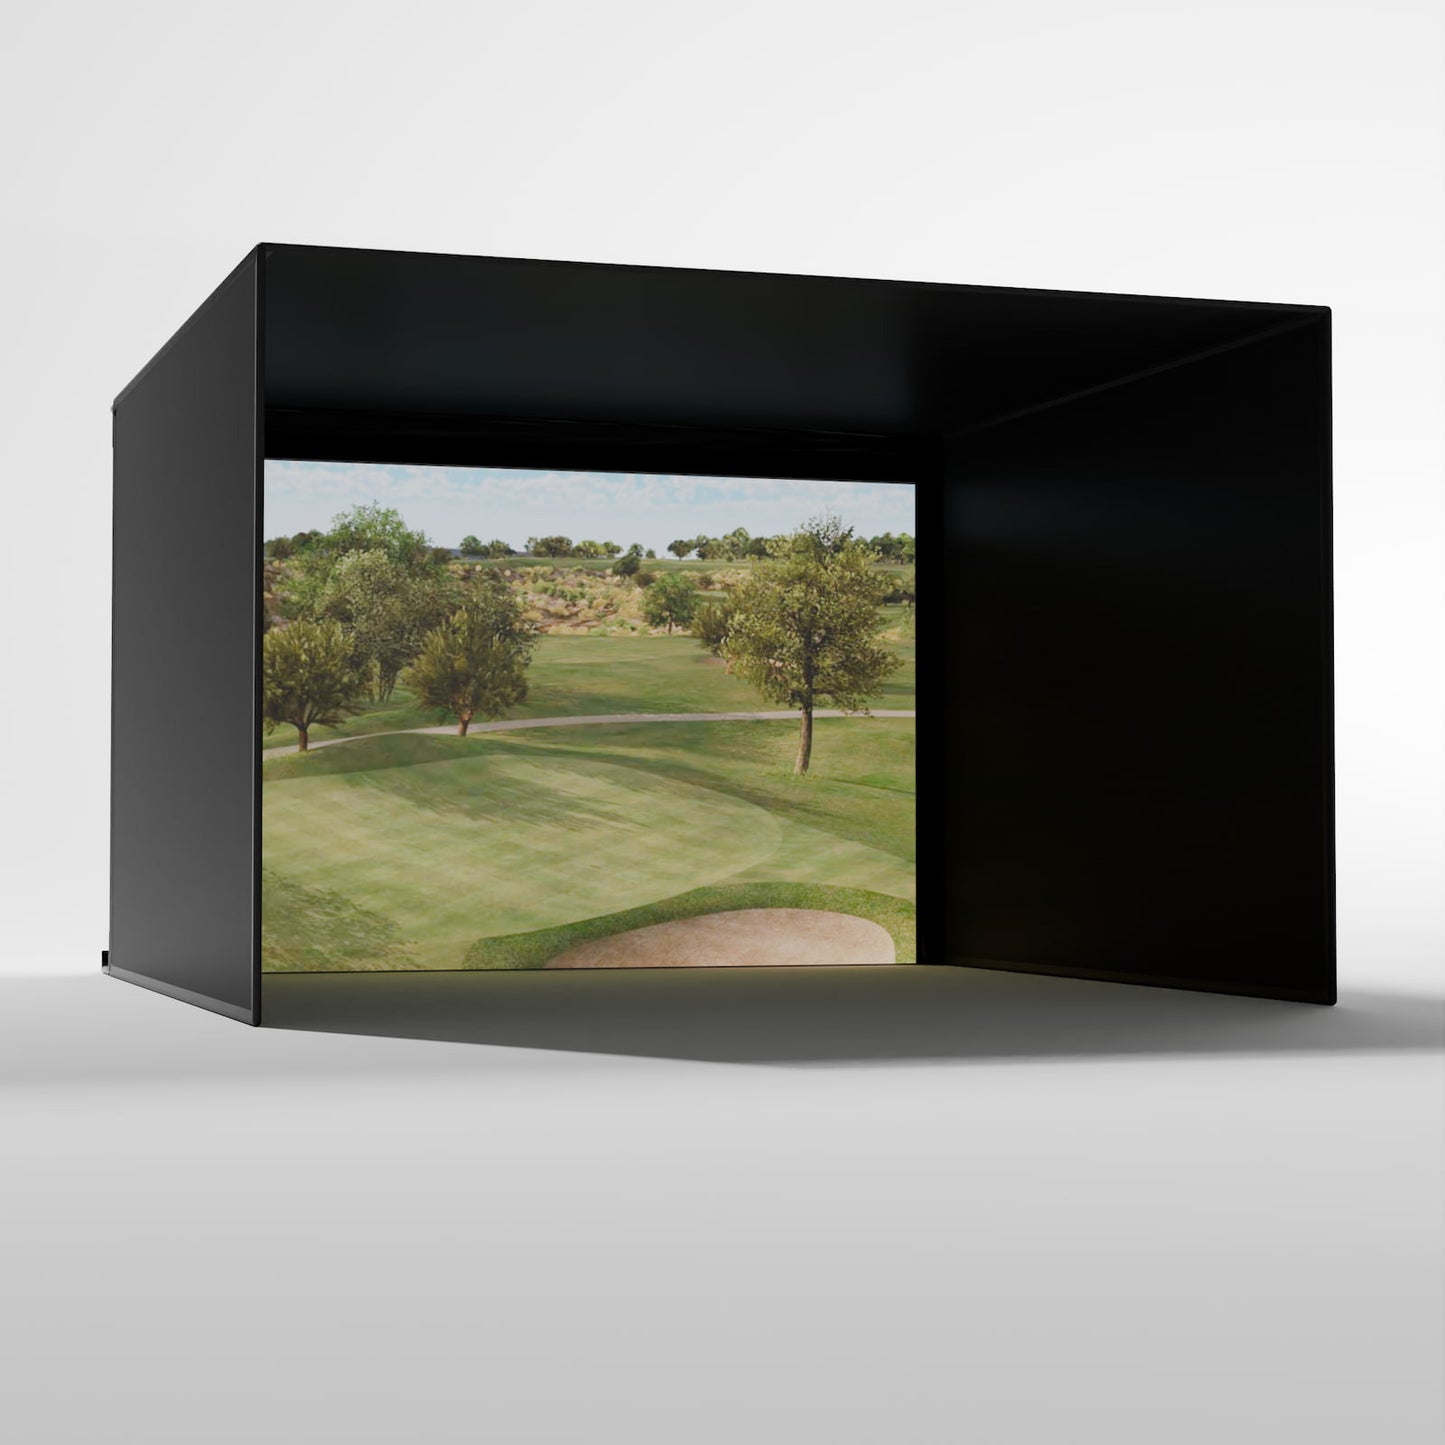
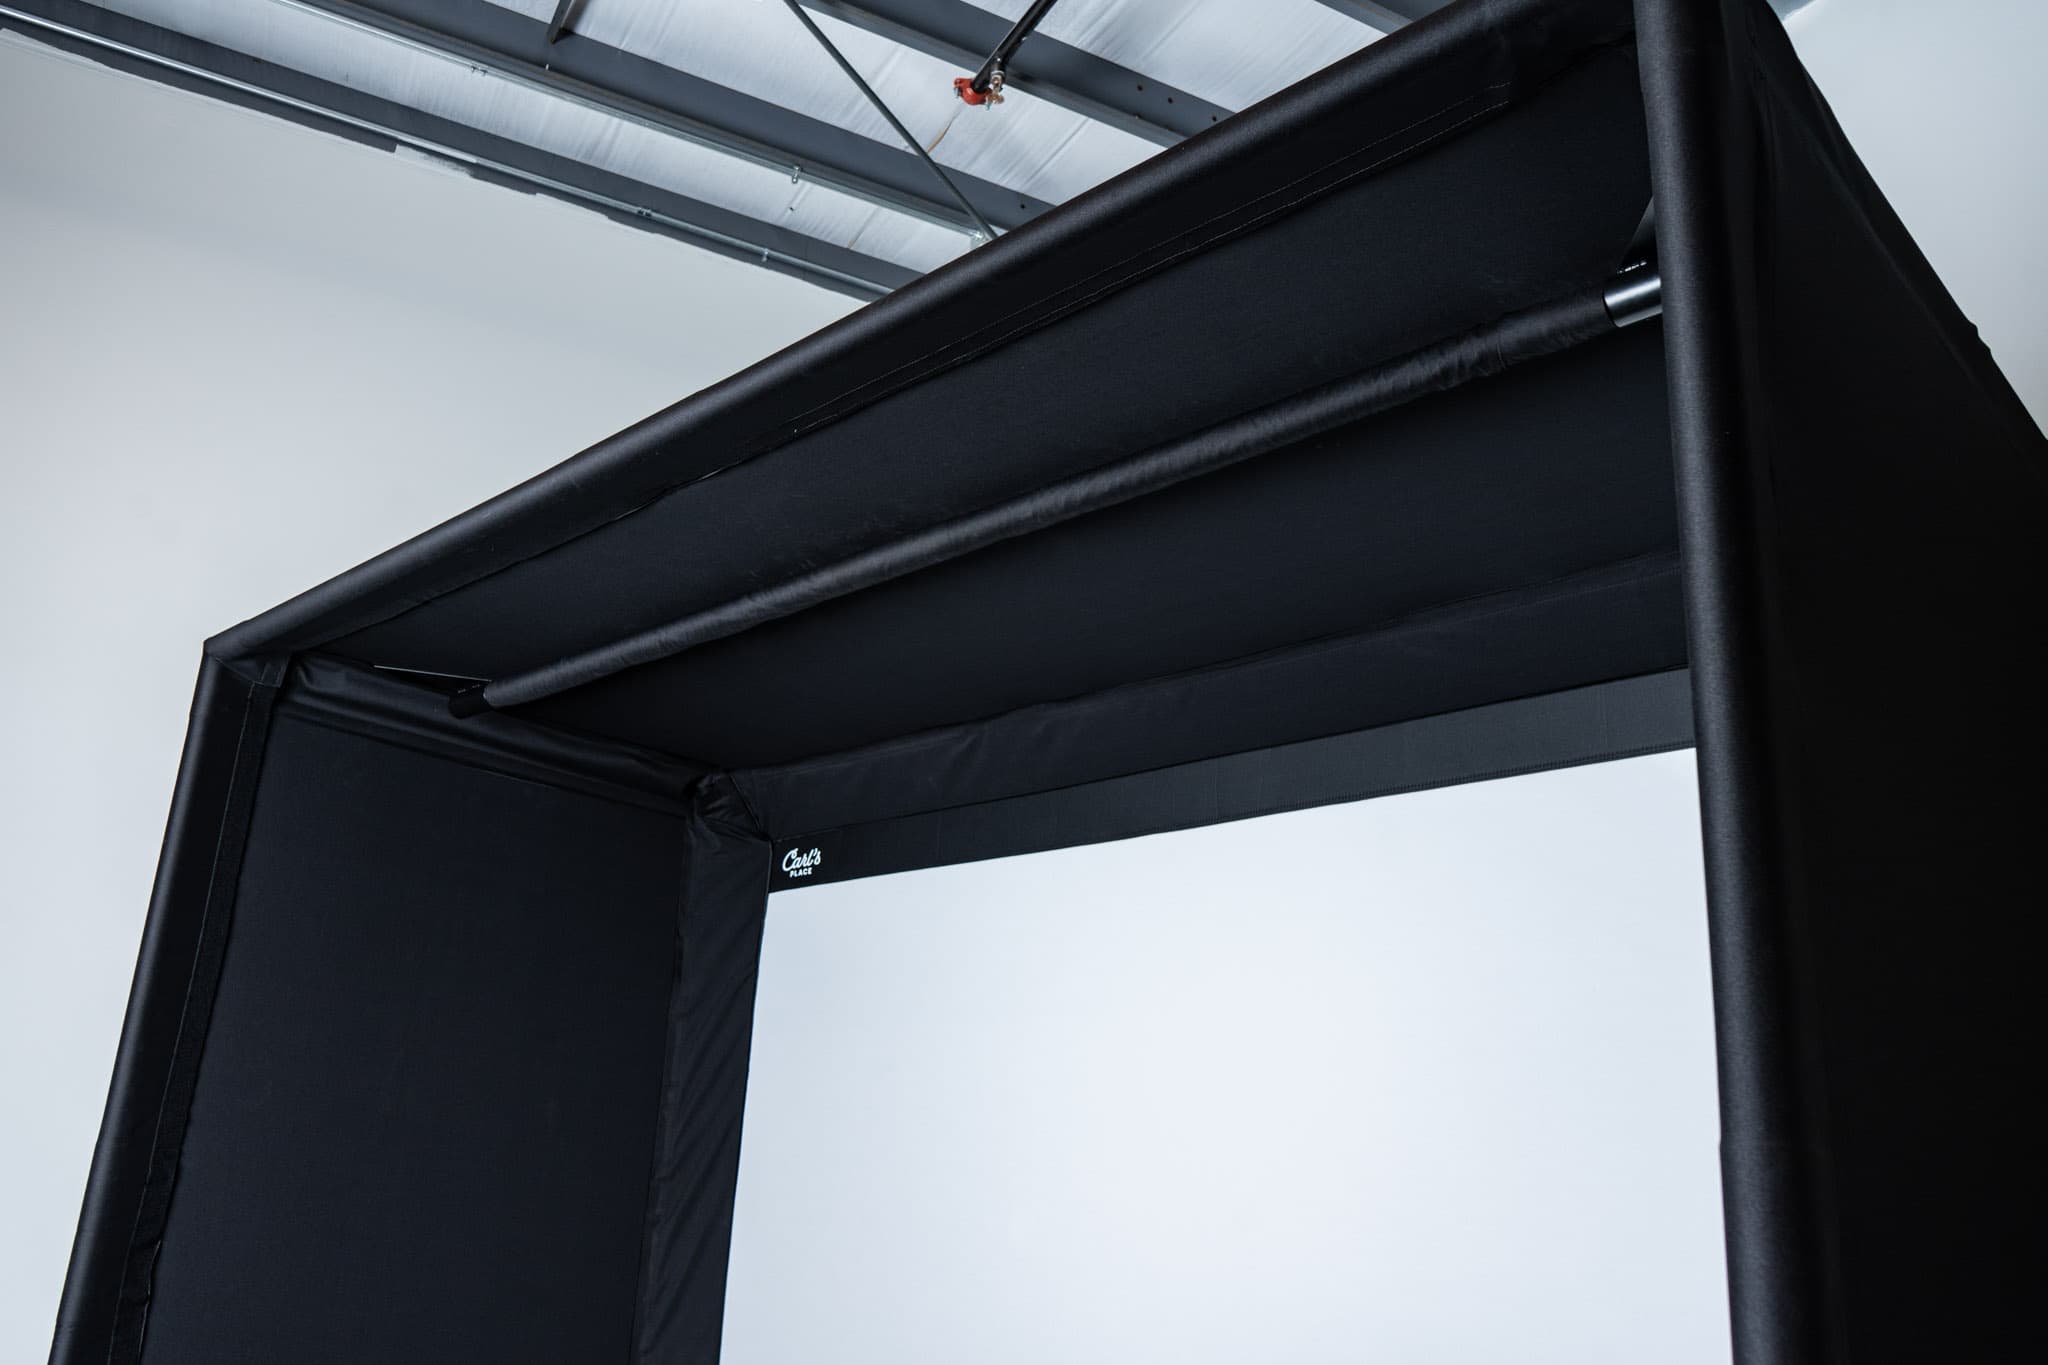
Meet the next generation of Carl’s Pro Enclosure — designed to bring a true golf simulator experience to your space without the stress of complicated setup. Built with Carl’s trusted craftsmanship, this updated model installs faster, looks sharper, and creates a darker, more immersive hitting area that helps you focus on your swing.
You can choose between a High-Contrast Gray Impact Screen, perfect for brighter rooms, or the Classic White Screen, ideal for maximum image brightness. The new BlackStop wrap-around enclosure simplifies setup with a single-piece design that blocks out light and gives your simulator a clean, finished look.
And now, installation is even easier. The ceiling and sidewalls have been combined into one seamless wrap-around piece — replacing multiple panels and saving roughly an hour of setup time. Fewer parts, less hassle, and a cleaner, pro-level finish from the start.
Every detail of this enclosure was designed to make your golf simulator build easier, safer, and more enjoyable. Be sure to check out the Key Features tab to see how Carl’s latest upgrades — from improved fasteners to overhead tech support — all come together to create the most refined Pro Enclosure yet.
Built for long practice sessions, smooth play, and that professional golf bay feel — right at home.
Key Features
BlackStop Wraparound Enclosure
A one-piece enclosure that darkens the hitting area for better contrast and cleaner visuals.
- Blocks out ambient light for a brighter projected image.
- Creates a polished, professional appearance.
- Makes installation quicker and simpler.
Choice of Premium Impact Screens
Pick the screen that best fits your space and lighting:
- High-Contrast Gray: Improves color depth and contrast in rooms with ambient light.
- Classic White: Provides maximum brightness in well-controlled lighting setups.
Detachable Flaps with Improved Fasteners
The screen and enclosure flaps are now separate pieces, designed with a wider 2-inch hook-and-loop fastener for a quicker setup and stronger hold. The upgraded fasteners make installation easier and help the flaps stay secure and durable over time.
One-Piece Ceiling and Sidewalls
-
Ceiling and sidewalls are now combined into a single wrap-around piece instead of multiple panels. This means significantly faster installation times (~1 hour of time saved).
Less Bounceback
Designed with zip ties and a bottom cable system that reduces bounceback — meaning your golf balls stay in play, not flying back at you.
It’s a safer, smoother way to practice, especially for faster swing speeds.
Made for Overhead Tech
The sturdy frame can support mounted projectors, launch monitors, and lighting.
Mount directly to the front bar or use the optional crossbar system to dial in your setup.
Custom Sizes for Any Space
Carl’s Pro Enclosure is custom-sized down to the inch, so it fits your room perfectly — not the other way around.
It’s a smart choice for home simulators or commercial bays where every inch matters.
Quick & Easy Setup
The new design combines ceiling and sidewalls into one seamless piece, so setup time drops to about two hours.
Everything fits together smoothly, with a clear assembly diagram included.
What's Included?
BlackStop Wraparound Enclosure
A single-piece, light-blocking enclosure that surrounds your hitting area with Carl’s signature BlackStop fabric.
- Creates a dark, theater-like environment that improves screen visibility and contrast.
- Combines ceiling and side panels into one seamless wrap for a polished, professional look.
- Designed for quick assembly — no more wrestling with separate fabric pieces.
Your Choice of Premium Impact Screen
Choose the screen that fits your lighting and performance needs:
- High-Contrast Gray Impact Screen – Delivers deeper colors and crisp visuals in rooms with ambient light.
-
Classic White Impact Screen – Provides maximum brightness and clarity in darker, light-controlled setups.
Both are made from durable, high-quality impact fabric that can handle thousands of shots while maintaining a smooth, projection-ready surface.
Foam Safety Inserts
Pre-cut foam panels designed to fit snugly between the frame and enclosure.
- Absorb off-center or high-speed shots that miss the screen.
- Prevent balls from rebounding off the frame.
- Help keep your enclosure protected while maintaining a clean, finished look.
Steel Corner Fittings and Hardware
Heavy-duty fittings that connect your EMT pipe frame securely at every corner.
- Built to last and engineered for precise alignment.
- Include all connectors, brackets, and fasteners required for assembly.
- Pipes are sold separately, but your kit includes a custom cut list and diagram so you’ll know exactly what to buy if sourcing locally.
Custom Assembly Diagram
Every enclosure includes a personalized, easy-to-follow setup guide that shows:
- Step-by-step instructions for building your frame.
- Cut lengths for each section of 2” EMT tubing if you’re buying your own.
- Layout references so you can assemble confidently and get the perfect fit in your space.
Zip Ties and Fasteners
A full set of heavy-duty zip ties and clips to secure your impact screen to the frame.
- Allows you to fine-tune screen tension for your ideal bounce and image surface.
- Extra ties are included so you can make adjustments over time as you dial in your setup.
What's Not Included?
EMT Pipe Framing
The enclosure’s steel fittings are included, but you’ll need to provide your own 2” EMT (electrical metal tubing) to complete the frame — unless you choose to add the optional Pipe Framing Kit.
- You can purchase EMT tubing from most local hardware stores.
- A full cut list and assembly diagram are included, so you’ll know exactly what lengths and quantities to get.
- For a plug-and-play experience, Carl’s Pipe Kit comes pre-cut and ready to assemble.
Ceiling Crossbar System
An optional upgrade that gives you flexibility when mounting projectors, launch monitors, or lighting overhead.
- Lets you position your tech at the perfect depth for your simulator setup.
- Easy to install and adjustable for future equipment upgrades.
- Recommended if you plan to mount a ceiling launch monitor like a Uneekor or Foresight system.
Safety Baffles
Optional hanging panels designed to catch high-angle shots that may bounce off the top of your impact screen.
- Helps protect ceilings and light fixtures in both home and commercial environments.
- Made from the same durable fabric as the enclosure for a seamless look.
- Strongly recommended for golfers with higher launch angles or higher swing speeds.
Back Cover & Pipe Kit
A great addition if you want a fully enclosed, theater-style simulator bay.
- The back cover blocks ambient light from behind and prevents projector light from escaping, improving overall brightness and contrast.
- The back cover pipe kit (sold separately) provides all the additional tubing needed for installation.
- If you’re already sourcing your own pipes, you can easily cut the extra lengths yourself instead of buying the kit.
Projector, Launch Monitor, & Electronics
The Pro Enclosure provides a strong framework for your tech setup, but it does not include the electronic components themselves.
- You’ll need to supply your own projector, launch monitor, PC or simulator software, and mounting accessories.
- Compatible with top simulator systems like Foresight, Uneekor, Garmin, FlightScope, SkyTrak, and more.
- This allows full flexibility to build a simulator that matches your preferred launch monitor and software ecosystem.
Lighting & Decorative Accessories
Any additional lighting, trim, flooring, or turf seen in product photos are not included with the standard enclosure kit.
- You can easily customize your space with your own hitting mat, flooring, and LED lighting for a finished, professional look.
- Recommended: soft ambient or track lighting for the most realistic simulator experience.
FAQ
Care and Use Information
How far away should I stand from my impact screen?
For the safety of both the golfer and the screen, we recommend standing a minimum of 10-12 feet away from the screen.
Can I iron or steam a golf impact screen?
We do NOT recommend ironing your golf screen, simply because it is very easy to damage the screen. And we want your golf screen to last you a long, long time. With wrinkles and fold marks, the best thing is prevention. Unpack your new screen immediately, and if you need to store it, fold it very loosely. But if you're reading a section on ironing your golf screen, it's probably too late for prevention. Know that mounting your golf screen to a frame with tension, like with our zip ties or ball bungees, and letting it relax for a couple of days will smooth out most wrinkles.
That being said...
We have also had success using a steamer to help get wrinkles and folds out. Using a clean, consumer-grade steamer with distilled water will help accelerate the wrinkle removing process, and should avoid leaving water marks on your screen.
Can I wash my golf screen material?
Check out this article for all our recommendations on "How to clean your golf impact screen".
Are there safety concerns when using a golf simulator?
We want your indoor golf set up to be fun, help improve your game, and be safe for everyone.
- Make sure to follow the assembly manual provided with your enclosure.
- Keep children, pets, and spectators out of swing range.
- Protect ceiling, walls, windows, cars & neighboring homes (accessories available to help, contact us.
- Understand our Terms of Sale of using a Carl's Place product sold by The Game Bunker.
Do I need to use a golf hitting mat?
Golf hitting mats give you a nice cushy surface to stand and swing your golf club. They help protect your joints from any impact during your swing. They also let you have a more realistic golf practice when you can tee up the golf ball at the perfect height and swing freely.
When choosing a size for your golf mat consider the golfer's needs. A size of 4'x5' will let most golfers swing a driver with their heels comfortably on the edge of the mat. A larger size, 5'x7' or 4'x9', would be able to accommodate golfers with a wide stance or if you have friends over swinging either rightie or leftie.
Golf Enclosure Information
What is the difference between Carl's Enclosure Kits?
Carl's DIY Golf Enclosure Kit offers you an easy, entry-level way to build a safe place to swing your clubs. An affordable, convenient kit, the DIY Enclosure Kit helps home golfers take the guesswork out of designing their own golf simulator.
Carl's Pro Golf Enclosure Kit is a higher-end enclosure for top-of-the-line performance in a golf simulator. Because it's available in wider, deeper bays with additional safety features it makes the best commercial golf simulator enclosure.
Carl's Curved Golf Enclosure Kit takes the Pro Enclosure’s sturdy design to the next level, adding a seamless curved screen for a truly immersive experience. Its unique structure surrounds the golfer, creating a lifelike, panoramic view that’s as impressive as it is functional.
Not sure which one is for you? Check out this article "DIY vs Pro" to help you decide.
How much space do I need for the enclosure?
When measuring for a golf simulator, make sure you take into account:
- Buffer space: You don't want your golf simulator right up next to any walls or ceiling. Balls that contact the walls or ceiling can cause damage and have unwanted bounce back.
- Footprint of the golf enclosure: Make sure to check the actual dimensions of the enclosure footprint. Our C-Series enclosures have built-in buffer space in the rear with the backset rear fitting.
- Safe golfing distance away from the screen: For the safety of both the golfer and the screen, we recommend standing a minimum distance of 10 to 12 feet away from the screen.
- Height of the golfer(s)
- Length of the golf club(s)
- Turf thickness, heating ducts, and soffits
- Furniture and access to doorways
When will my enclosure ship?
Our golf enclosure kits are made to order (which is why we can customize them down to the inch!). We make sure they are measured, sewn, and packed perfectly before they are ready to ship. Because of that, production lead time may fluctuate based on volume.
- All products take 1-2 business days to process
- Most of Carl's Places products are delivered within 7-10 business days
- Once your order is placed, you will receive tracking info with a good faith delivery ETA. Please note this is an estimate and not a guarantee.
What if the black enclosure material gets hit with a golf ball?
The enclosure material is not designed to take a direct hit from a golf ball. However, if you hit the white impact screen, and it bounces and hits the enclosure, you should not experience any issues.
Can I get a replacement screen for the enclosure?
We can easily make you a replacement screen to save you money. Replacement screens can be ordered by contacting one of our Customer Service Experts or emailing customersupport@thegamebunker.com. Click this link, if you want to learn more about extending the life of your golf screen.
How big is the enclosure?
The Resources section lists actual frame dimensions to guide you in determining which enclosure is the right fit for your space.
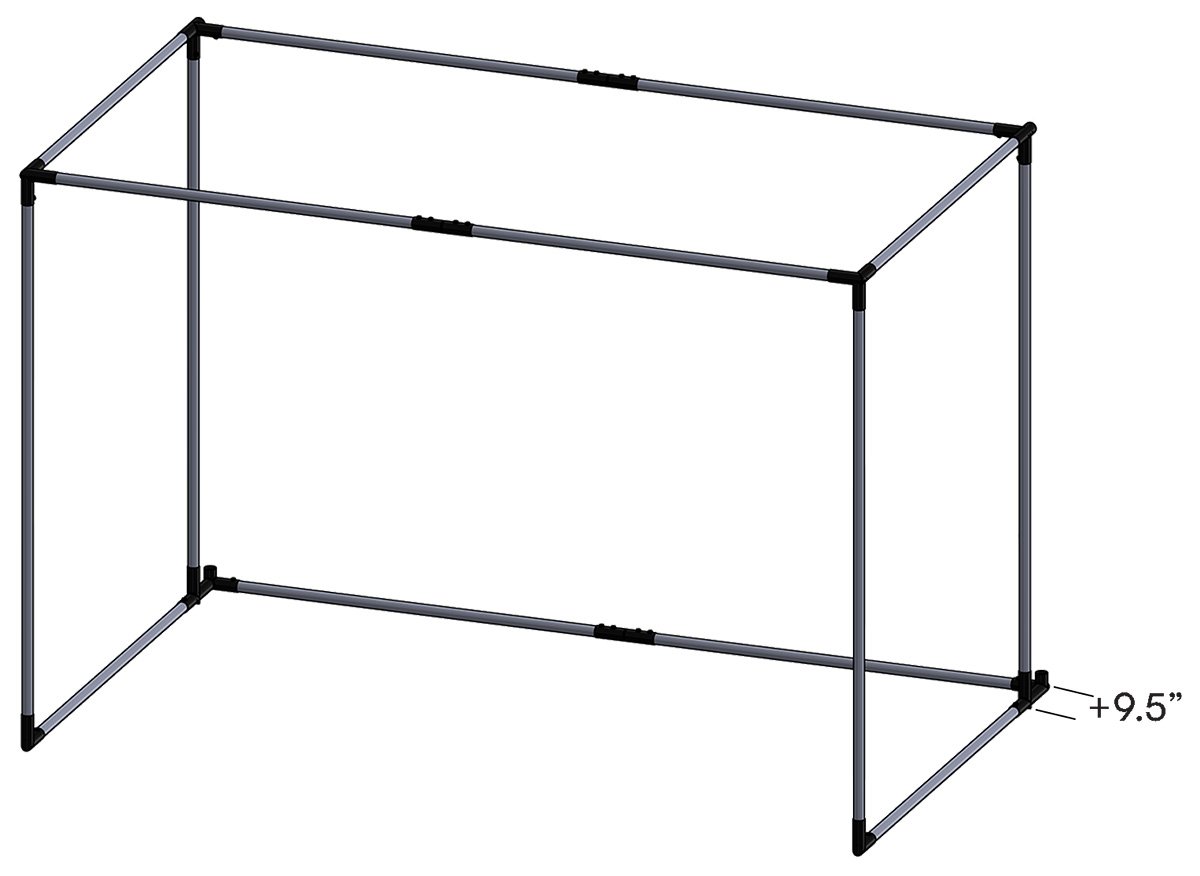
Note how the C-Series enclosures have a backset rear fitting. This creates a footprint 9.5" deeper than the listing size. Bonus! You needed that buffer space anyways so your hard-hit golf balls don't contact the wall. It's just built into the enclosure footprint.
Should I add the movable crossbar to my Pro Enclosure?
The Movable Crossbar for Carl's Place Pro Enclosures is a great accessory for those looking to mount a projector and overhead launch monitor or lighting to their enclosure. It’s easy to install at any depth for perfect alignment of your overhead launch monitor. Also works great for overhead lighting.
Installation
What pipes do I need to construct the enclosure kit frame?
Our Pro Golf Enclosures require 2-inch EMT ((Electrical Metal Tubing/Conduit). We recommend you add a Pipe Framing Kit to your order so you get pre-cut, perfectly sized, and marked pipes for your enclosure frame. That way all you have to do is assemble your frame and enclosure.
Note, these pipes can be difficult to source locally. Be sure you can purchase it near you before making your final buying decision. Either way, we will provide a diagram indicating the required cut lengths for your specific size kit.
Pro Enclosure orders with a 'Pipe Framing Kit' ship via ground shipping.
How long does it take to assemble the enclosure?
Carl's Place Pro Golf Simulator Enclosure Kits assemble in approximately 2 hours. It's best if you have a couple helpers, especially for lifting and connecting pipes for the frame. See this How to assemble my Pro Golf Enclosure for more info.
What are EMT pipes?
EMT stands for Electrical Metal Tubing, also known as, Electrical Metal Conduit. We often just refer to them as pipes on our website. You need EMT (pipes) to build the frame for your enclosure/screen. Do not mistake PVC pipes for EMT. PVC will not work with our fittings. You have 2 options on how to get the necessary pipes:
- Add a Pipe Framing Kit. (You'll see these as accessories on our DIY and Pro Golf Enclosure Kits.
-
Source EMT pipes at your local building supply store.
- DIY Enclosures require 1″ EMT.
- Pro and Curved Enclosures require 2" EMT which can be more difficult to find. Make sure you have a source for your EMT when selecting whether you want to add on our Pipe Framing Kit options.
Owners Manual/Assembly Guide, Specifications & Instructional Videos
Pro Golf Enclosure Owners Manual
Pro Golf Enclosure Specifications